Services in Azure are constantly updated to improve on its performance and overall functionality. In this article we will be covering the new changes in the Azure Remote App Template creation. Before the changes were made ideally you had to meet a long list of perquisites before uploading your virtual hard disk (vhd) into Azure using PowerShell. (Click
Here to view old process)
The Azure Remote App Team has indeed heard the customers feedback and reacted to make deploying your custom template not only easier but seamless on our part.
Note: If you do not have an Azure subscription take a moment here and pause. If you have access to Biz Spark, Dream Spark or an MSDN Subscription you have Azure credits allotted to you every month. It is strongly recommended that you use one of these options to continue with the lab. Keep in mind Azure is a pay as you go service.
Another option is if you have not used an Azure trial yet. One can be obtained by visiting http://aka.ms/try-azure This will give you a $200 credit limit or 30 days of Azure. Which ever one comes first. Disclaimer - A credit card is required for the free trial.
With all of that being said, "Lets get started!"
Within the
Azure Portal not the
Preview Portal click on New, Compute, Virtual Machine and From Gallery as seen below.
From within the Gallery select the newly added Remote Desktop Session Host Image. This image was per-built by the Azure Remote App team to ease the deployment of your custom images.
Give your virtual machine a name while setting the username and password as normal. The size of the virtual machine does not matter as we will capture an image of it when we install our applications. Note: Selecting the size of the virtual machine can vary from deployment to deployment given the specifications of the need for your application/s. Please review the system requirements for proper installation of your application.
There isn't a need to open any other endpoints. PowerShell and the RDP endpoints are the only one's needed for a successful custom template deployment.
No need to add any custom extensions or security extensions. Azure Remote App within the service itself provides antivirus and security.
With your virtual machine newly created Remote into the server using RDP by selecting your virtual machine from within the portal and selecting connect at the bottom launching the RDP connection. Enter your credentials you set earlier to log into the machine.
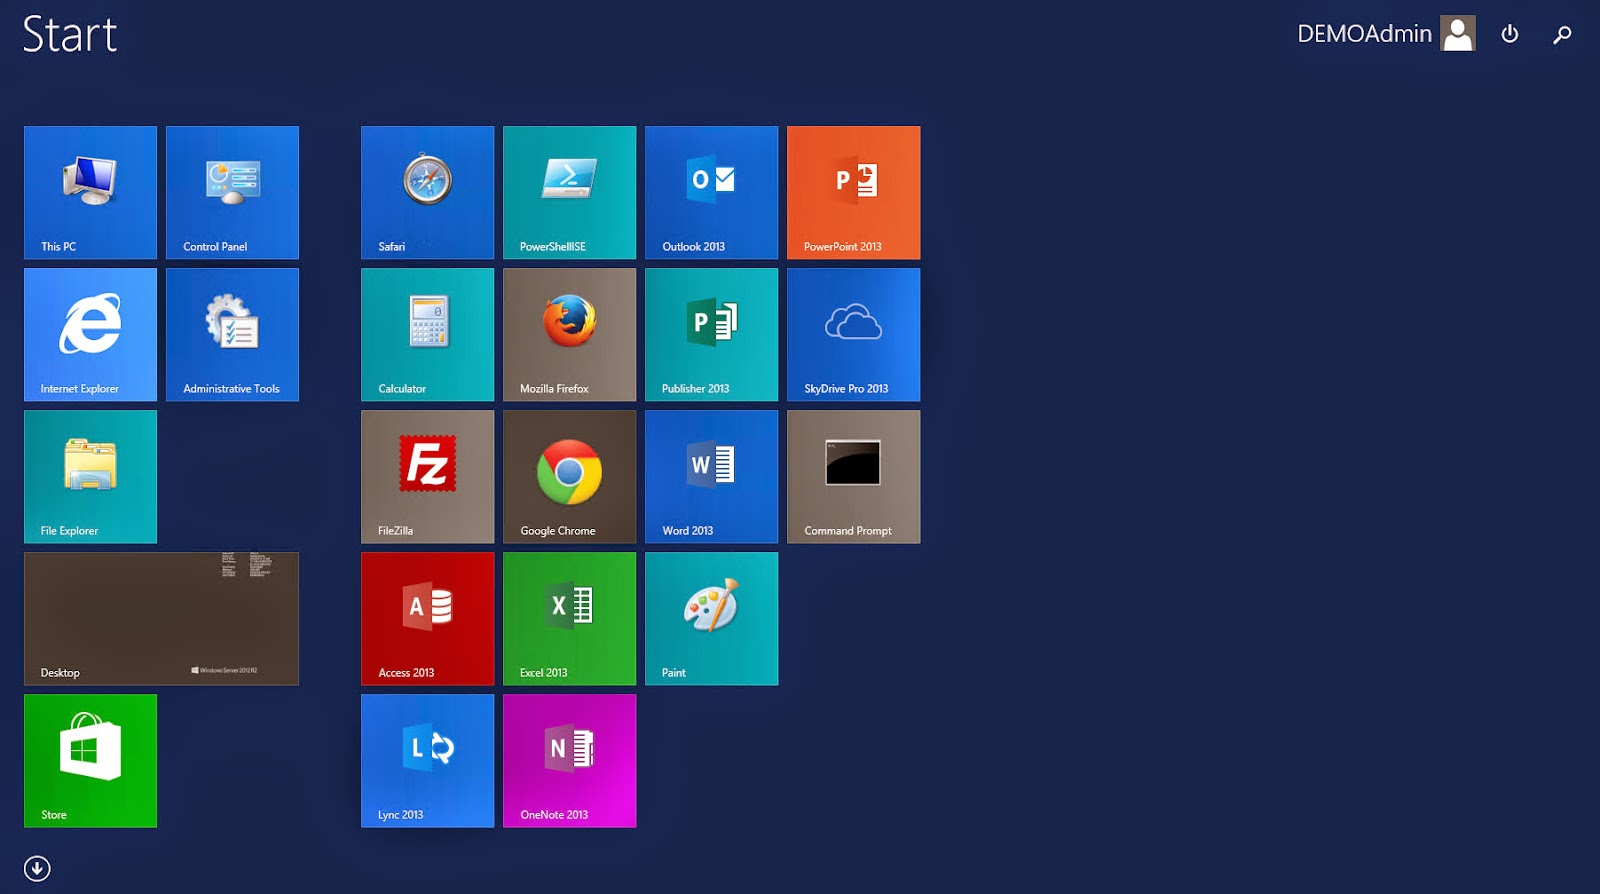
Install the applications that are needed by your organizations users.
Within the Azure Remote App Service your application/s can be discovered two ways. The easiest method would be to pin each application shortcut to the start menu. The other is by the applications path (i.e. %SYSTEMDRIVE%\Program Files (x86)\Microsoft Office\Office15\WINWORD.EXE) if we were publishing Microsoft word to our users. Again pinning the application to the start menu would be the easiest method as seen below.
With the Image template there is a PowerShell cmdlet called validate remote app image. After the installation of your applications run this cmdlet and then enter the command to sysprep your machine as seen below.
Command to sysprep your machine
C:\Windows\System32\sysprep\sysprep.exe /generalize /oobe /shutdown
Upon the sysprep completion the virual machine will shutdown and be stopped within the Azure platform.
Be sure to delete your cloud service as it is no longer needed. This will not affect your custom template. Note: You are deleting the cloud service to prevent additional charges within the Azure platform.
In your virtual machine service highlight the virtual machine that has been syspreped and select capture at the bottom of the screen.
Enter a image description that can be easily recognizable to you for future deployments,
The image is registered within your images gallery in the virtual machines service.
Head back into the remote app service select template images at the top and then the add button circled in red as seen below.
The template image import wizard begins. Select Import an image from your Virtual Machines Library as seen below.
Select your image you captured earlier in the deployment process. Earlier we did sysprep the machine. Check the box that states "Confirm that I followed these steps to create my image"
Give your image a name and a location you would like to deploy it in. Note: Only the region you deploy the template in will have it. If this template needs to be deployed in multiple locations then you will have to add it to each location specifying a unique name for each location.
The upload begins! Told you these method would be easier! :)
With the image now ready to be linked to a collection. Simply select New at the bottom of the Azure portal, App Services, Remote App and then Quick Create. Give your collection a name and select the region. Remember your template image is region specific as shown below between the East Us where we uploaded the template. Versus the West US where we did not.
Your collection will take up to an hour to provision. Once completed you can publish your apps to your users for them to utilize the service.
Ideally if you need to update a collection with a new image please visit the blog article Updating Azure Remote App Template Images found
here
By:
Adnan Cartwright