Friday, November 29, 2013

Deploying an Internal PKI for Azure Recovery Services Prerequisite

Azure Recovery Services uses certificates to authenticate and encrypt connections to and from the Azure Platform. In the training video - Configuring Azure Backup In Windows Server 2012 the PKI environment was already setup and configured. This blog entry is the prerequisite to that configuration.

In our lab we have a Domain Controller where Active Directory Certificate Services will be installed and a File Server both using the Windows Server 2012 R2 and Windows Server 2012 Operating Systems. Below is a picture of lab in HYPER-V.


Let's get our PKI installed. On DC-1 we will add a role and select Active Directory Certificate Services.


 Next we will take the default selection of a certificate authority and select next.


Once installation is completed our next step is to configure Certificate Authority for Certificate distribution.


 When the specify credentials screen appears we will take the defaults and select next.


Select Certificate Authority and select next.

 
 Select Enterprise CA and select next.

 
 Select Root CA and select next.


We will create a new private key and click next.

 
 In the Cryptography for the CA we will select 4096 for the key length SHA256 for the hash algorithm and RSA#Microsoft Software Key Storage Provider for the Cryptographic Provider and click next.
 
 We will use the default for the CA name.

 
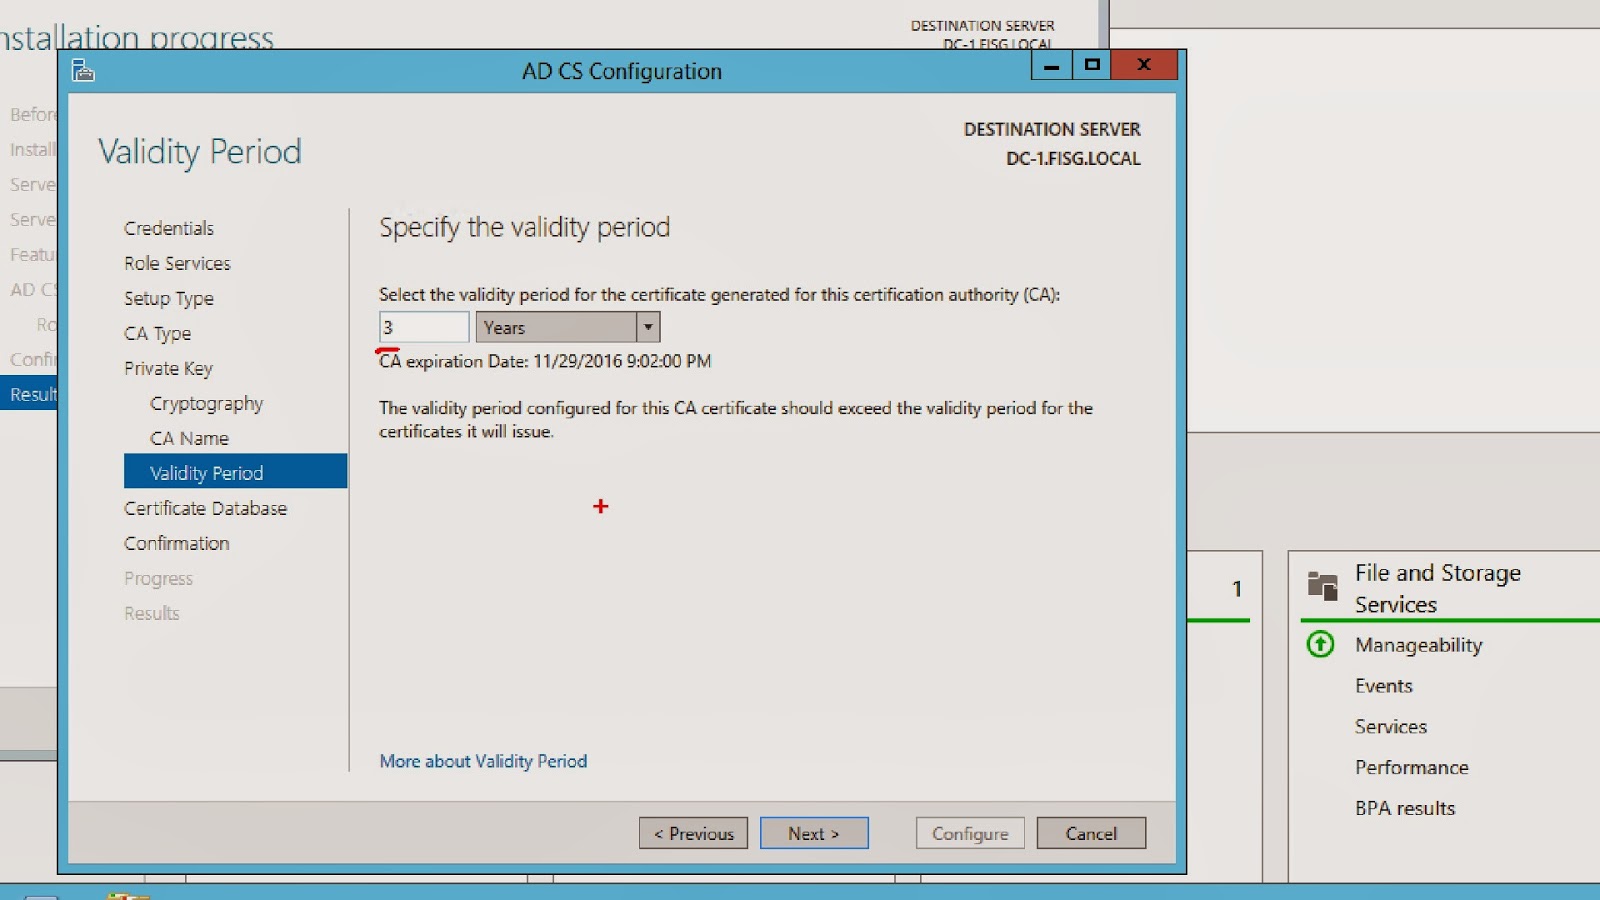
 The validity period we will use the length of 3 years.

 
 We will take the database defaults and click next.

 
 Confirm our configuration and then click configure.

 
 We have successfully configured an Internal PKI environment.

 
 Our Certificate Services is now ready to distribute certificates on the network and to Azure!

 
Next we will head to our File Server and select run then enter mmc for the Microsoft Management Console.

 
 In the console we will select file then Add-Remove Snap-in.

 
 In the Snap-in select Certificates then the add button.

 
 Select the Computer Account then click next.

 
 Leave the default selection for the Local Computer then select Finish.

 
 Note that the Certificates on the Local Computer is selected for management. Click ok.

 
 Expand Certificates, then Personal and then Certificates.

 
Right click an empty spot in the right pane for the menu to appear. Select All tasks then Request a New Certificate.
 
 The Enrollment wizard will kick off the click next.

 
 Select computer then Enroll.

 
 The certificate request for enrollment is successful! Click Finish to close out.

 
Our next step is to export the certificate. Make sure that the certificate you are exporting is the Client Authenticated one. Select your certificate right click, select all task then export.

 
 Do not export the private key as it is not needed for Azure Recovery Services. Click next.

 
 We will take the default of the DER encoded binary X.509 cert.

 
 I will place the certificate on the desktop for easy access.

 
 The export of our certificate is successful!

 
 You now have a certificate for your Azure Recovery Services Vault in the Azure platform!


To get a free 30 day trial to Azure - http://aka.ms/try-azure
 
To download Windows Server 2012 R2 - http://aka.ms/msproducts
 

Thursday, August 29, 2013

Windows Server 2012 R2 WSUS Post-Installation Task Fails

Windows Server Update Services has been improved in Windows Server 2012 R2 by adding SHA256 hash capability for additional security SSL Certificates for secure Deployment on Microsoft Security Updates.

Windows Server Update Services is a built-in server role that includes the following enhancements:

  • Can be added and removed by using the Server Manager
  • Includes Windows PowerShell cmdlets to manage the ten most important administrative tasks in WSUS
  • Adds SHA256 hash capability for additional security
  • Provides client and server separation: Versions of the Windows Update Agent (WUA) can ship independently of WSUS

Configuring the Windows Server 2012 R2 WSUS role with the Windows Internal Database (WID) brings back an error within the Post-Installation Task as seen below.


The reason for this error is that in my case a SCSI Hard Drive is configured instead of a local attached disk. As seen below.


WSUS in this case needs a locally attached Drive which is shown below.


After the changes have been made let's open WSUS again to re-run the Post-Installation Task again. 


 Success!!!!!


Now you can finish off the WSUS Configuration and Deployment!!!


Happy Administrating!!!!
 
To Download a free trial of Windows Server 2012 R2 visit http://aka.ms/msproducts
 
For a 30 day trial of Azure visit http://aka.ms/try-azure


Saturday, August 10, 2013

Mounting an Image to Convert Windows Server 2012 R2 Core to Full Installation

PowerShell is proving more and more to be an Administrators right hand in handling many task. Converting a Core Installation to a GUI Installation in Windows Server 2012 R2 is one of those task. Many times I have come across a File Server that is running on Core and more roles such as Windows Deployment Services needs to be installed but is not supported. Here starts the story of either backing up the data or migrating the data off to another File Server or Storage resource.

In a Full Install of Windows Server 2012 R2 that has been turned into Core running the PowerShell command
Install-WindowsFeature Server-Gui-Mgmt-Infra,Server-Gui-Shell –Restart –Source
will install the Gui back on the server.

However, if you run that same command on a Core Install you will get an error message as the screen below shows.


In a Core R2 Install to convert from the CUI to GUI we will have to mount an image of Server 2012 R2. To do this we will need the installation media on which we installed Server 2012 Core R2. Next we will have to make a Directory for our image to be mounted in.

On our Server Core Server we will make a directory called mount-image on the root of C:\ as shown below.


Next we will mount the image to the mount-image folder. Our install media is in the D:\ drive. We will need to see what version of Server we do need to mount. To do this we need to type the PowerShell command Get-WindowsImage -ImagePath D:\Sources\Install.wim as seen below. We installed Server 2012 Standard Core so we will mount Index Image 2 for the Full Server GUI.


To mount the image type the PowerShell Command

Mount-WindowsImage -ImagePath D:\sources\install.wim -Path C:\mount-Image –Index:2 -readonly

This process can take a while as seen below.


The next step is install the image we just mounted by running the below cmdlet.

Install-WindowsFeature Server-Gui-Mgmt-Infra, Server-Gui-Shell –Restart –Source C:\Mount-Image\Windows\WINSXS


Now the Full Installation of Server 2012 R2 is installed!!!!


Happy Server Administrating. If you need to download Server resources or if you would like to try this lab in Azure visit:

For Server Downloads - http://aka.ms/msproducts

For a free trial of Windows Azure - http://aka.ms/try-azure

By:
Adnan Cartwright


Wednesday, July 10, 2013

File Server Management using File Server Resource Manager (FSRM)

Windows Server 2012 has brought many new features to the new platform to enhance the productivity and efficiency of IT in many ways. From new innovations in Hyper-V 3.0, SMB 3.0, Active Directory, Security, Networking and so one. The File Server Role was not overlooked. In Server 2012 we now have the built in capability to manage and restrict what goes onto a File Server and even be notified of when and who tries to put something that has been restricted.

The lab setup is outlined in Figure 1. Just in case you would like to duplicate the lab.


If you have set up a role or feature before in Server 2012 you know how easy it will be to get up and running. The File Server Resource Manager is no different. To install this role on your File Server head over to Add a role and Feature then select File and Storage Services, then File and ISCSI Services selecting the File Server Resource Manager Role as outlined in Figure 2.


Once the installation is successfully the next step is to open FSRM from the Tools menu to enter the console as outlined in Figure 3.


FSRM allows us to block files not only by the extension of the file name but by looking into the file itself and then it determines the content of the file whether it be video, picture, music, etc.. In some environments that I have encountered there were some users that would use the company's file server to save inappropriate files that they have downloaded from the internet or they themselves brought into corporate to share among the staff. Imagine how that turned out. So now with FSRM we can block the content of these files keeping a tab of what is stored on our file servers. When joined in with an email solution (in this lab we are using Exchange 2013) notifications can be sent to IT as well as the user notifying them both that someone tried to place a file that is set as no no on the server. If we only want Word documents, or Excel Spreadsheets stored in a folder we can now administrate that leveraging FSRM.

To establish this expand the File Screening Management option, then select File Groups. We have a default selection available to us that covers the basics of the files you may want to block. In our lab we have created a Torrent file Block group to block torrent files as displayed in Figure 4.


To Create a File Group select Create File Group. Define the name of the group and then the extensions you would like to block as outlined in Figure 5. If there are any exclusions they can be added to allow certain files. An example of this would be to block all movie files but the only exclusion would be MP4. Exclusion override blocks at all times.


Our next step is to create a File Screen Template. We created our Block Torrent File before in the File Group so we will select that from the template list. Next we will name the Template Name for the Screen Template and configure it's screening type. Active scanning will not allow the file to be saved at all and notifications when setup will be sent. Passive screening allows the admins of the organization to monitor and/or build a report of a users actions. Next we will select our Torrent file block in the group we made earlier as outlined in Figure 6 below.


The next step now is to create a File Screen process. Where do we want this configuration to apply, meaning which folder and on which server. In our case it is the FISG Data folder on the File Server we have in lab as shown in Figure 7 below.


We now have a source template in place to block audio, video and torrent files. Figure 8 below shows this.


To configure the email settings for only the admin to receive notifications or both the admin and client right click the source template and then select email message. Enter your admin's email address and select okay as seen below in Figure 9.


Next let's test this new configuration on the client in our network. On our client machine we have a torrent file that is located in the documents folder as seen in Figure 10 below. We will attempt to store this file on the File server where we have FSRM enabled and configured.


Here we tried to add that torrent file and was denied. We also received the email notification making us aware that FSRM is in affect that the admin's on the network are aware shown below in Figures 11-13.


Figure 12


Figure 13


Now we have FSRM totally enforced and in effect on the network.

To download Server 2012 products to try this lab out visit
http://aka.ms/msproducts

By Adnan Cartwright