
In environments that do not employ security technologies such as IPsec or HTTPS, the DNS protocol can be vulnerable to attack due to an inherent lack of authentication and integrity checking of data that is exchanged between DNS servers or provided to DNS clients. Domain Name System Security Extensions (DNSSEC) is a suite of extensions that adds security to the DNS protocol by providing the ability for DNS servers to validate DNS responses. With DNSSEC, resource records are accompanied by digital signatures. These digital signatures are generated when DNSSEC is applied to a DNS zone using a process called zone signing. When a resolver issues a DNS query for resource record in a signed zone, a digital signature is returned with the response so that validation can be performed. If validation is successful, this proves that the data has not been modified or tampered with in any way.
To find out more on how DNSSEC works visit http://technet.microsoft.com/en-us/library/jj200221.aspx for more details.
So how do I deploy DNSSEC in my environment?
Open DNS Manager and right click the zone you would like to sign. Select DNSSEC and then Sign the Zone.

The DNSSEC Wizard will open up for you to begin the process.

There are three options you can choose to get a Zone signed. The default option as seen below will configure the zone with minimal settings which are good for you to get an idea of the DNSSEC configuration.

The second option signing a zone with an existing zone allows you to receive a Trust Anchor or Point for the existing zone. The Trust Anchor is your starting point for trust with a DNSSEC environment.

We will select the first option so that we can customize the zone to our needs.


Here we have the defaults of the algorithm that will be used. We will use the RSA/SHA 256 encryption type. The longer the encryption key the more secure it will be but the longer the communication will take between client and server. The shorter the encryption length the faster the communication but the less secure it will be.


The Zone Signing Key will be half of the Key Signing Key as seen below.


Right Click the Zone that was just signed, select DNSSEC and then properties.


Enable the distribution of the trust anchors for the zone. Here you can enable and disable trust anchors if need me.

The trust points will remain blank once enabled. Refresh the console and you will now see the trust points for the zone generated as seen below.

At this point our DNS Server now have secured communication within the network. Our clients however are not yet configured. We will use Group Policy to apply the configuration of DNSSEC to our clients within the environment. To do this we open the Group Policy Management Tool.
In the Group Policy Management Tool create Group Policy Object under the domain called DNSSEC or what can be identified by you as seen below.

Next we will configure the GPO by selecting Computer Configuration, Policies, Windows Settings and then Name Resolution Policy as pictured below.

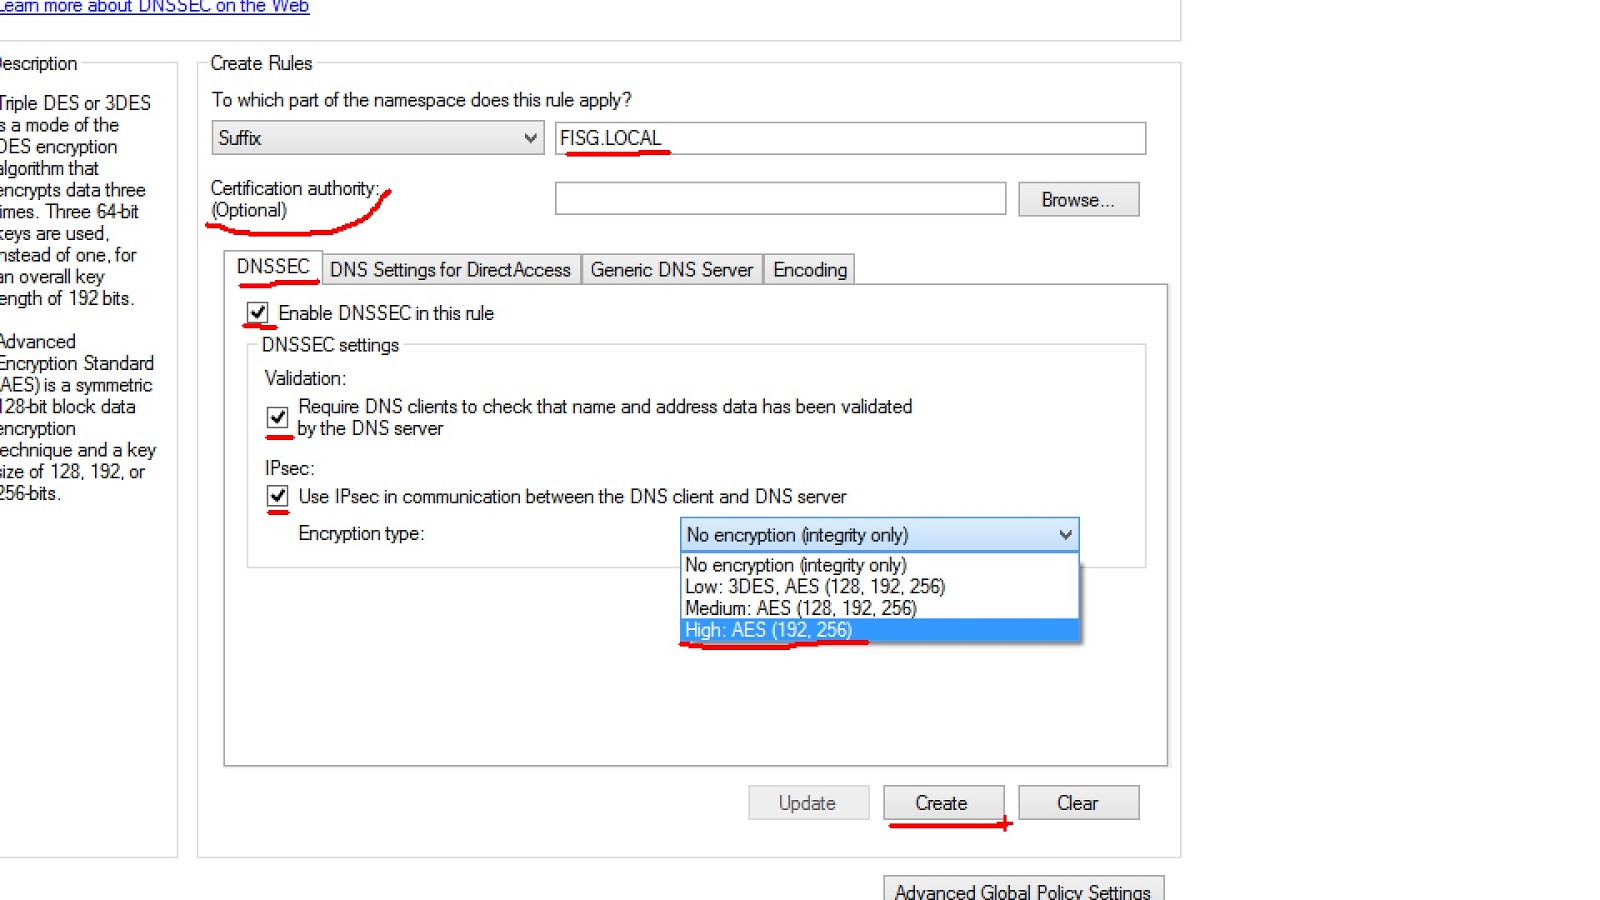
In the Name Resolution Policy GPO edit settings. A rule can be created under the suffix, prefix and so on. We will configure DNSSEC under the suffix fisg.local for the lab.

Next we will enable DNSSEC with the validation settings in place. There is an IPsec selection to the bottom which you can include in the configuration. Note: For IPsec to be enabled successfully in DNSSEC an already existing IPSEC configuration should reside on the network. Enabling IPsec with the level of encryption will not deploy IPsec to your environment. It instead uses the existing one that is present. If there is none. Your client computers will no longer be able to communicate with your DNS Servers until the policy is removed.
Next apply the GPO on both the DNS Server and Clients by using the gpupdate /force command in PowerShell. You can check your settings by opening PowerShell and running the
get-dnsclientnrptpolicy command. You will get a screen as seen below. Your DNS Server will also look like below to show that validation and DNSSEC is now implemented.


DNSSEC is now successfully installed!
By Adnan Cartwright
No comments:
Post a Comment
Note: Only a member of this blog may post a comment.