Sunday, May 5, 2013

Deploying DNS SECURITY (DNSSEC)

Windows Server 2012 has brought many new features with its new platform. One of these new features Domain Name System Security or also commonly known as DNSSEC. So what is DNSSEC and why use it?

In environments that do not employ security technologies such as IPsec or HTTPS, the DNS protocol can be vulnerable to attack due to an inherent lack of authentication and integrity checking of data that is exchanged between DNS servers or provided to DNS clients. Domain Name System Security Extensions (DNSSEC) is a suite of extensions that adds security to the DNS protocol by providing the ability for DNS servers to validate DNS responses. With DNSSEC, resource records are accompanied by digital signatures. These digital signatures are generated when DNSSEC is applied to a DNS zone using a process called zone signing. When a resolver issues a DNS query for resource record in a signed zone, a digital signature is returned with the response so that validation can be performed. If validation is successful, this proves that the data has not been modified or tampered with in any way.

To find out more on how DNSSEC works visit http://technet.microsoft.com/en-us/library/jj200221.aspx for more details.

So how do I deploy DNSSEC in my environment?

Open DNS Manager and right click the zone you would like to sign. Select DNSSEC and then Sign the Zone.


The DNSSEC Wizard will open up for you to begin the process.


There are three options you can choose to get a Zone signed. The default option as seen below will configure the zone with minimal settings which are good for you to get an idea of the DNSSEC configuration.


The second option signing a zone with an existing zone allows you to receive a Trust Anchor or Point for the existing zone. The Trust Anchor is your starting point for trust with a DNSSEC environment.


We will select the first option so that we can customize the zone to our needs.

Our starting point will be our Primary Domain Controller that we have in lab. The Key Signing Key is what DNSSEC uses to encrypt the DNS server to prevent redirects and zone walking from happening.

Next we will add the Key Signing Key Algorithm to our DNS Server.


Here we have the defaults of the algorithm that will be used. We will use the RSA/SHA 256 encryption type. The longer the encryption key the more secure it will be but the longer the communication will take between client and server. The shorter the encryption length the faster the communication but the less secure it will be.


The Zone Signing Key is our next step.
The Zone Signing Key will be half of the Key Signing Key as seen below.


The Trust Anchors is the starting point of your signed zone. We will leave it disabled for now and will later show how to manually enable it later.


Click next to move on to the signing parameters. We will take the defaults for now.


Our next screen in our signing of our zone is Next Secure or NSEC. DNSSEC-aware servers can choose to send an "NSEC3" record instead of an NSEC record when a record is not found. The NSEC3 record is signed, but instead of including the name directly (which would enable zone enumeration), the NSEC3 record includes a cryptographically hashed value of the name. The NSEC3 record includes both a hash after a number of iterations and an optional salt, both of which reduce the effectiveness of pre-computed dictionary attacks. Salting increases the number of dictionaries necessary for an attack, while additional hash iterations increase the cost of computing each dictionary.

We will use the NSEC3 option with its default to finish the configuration off.

With our configuration completed our next step is to verify that everything was successfully with the initial deployment. Also let's take a closer look at the configuration options for DNSSEC.

Right Click the Zone that was just signed, select DNSSEC and then properties.


The configuration menu appears for more options for DNSSEC. Below we see that DC-1 our Primary Domain Controller is our Key Master.


Earlier in the process of the Zone Signing we wanted to point out the manually method of adding a Trust Anchor. As seen above select the Trust Anchor tab.

Enable the distribution of the trust anchors for the zone. Here you can enable and disable trust anchors if need me.


The trust points will remain blank once enabled. Refresh the console and you will now see the trust points for the zone generated as seen below.


At this point our DNS Server now have secured communication within the network. Our clients however are not yet configured. We will use Group Policy to apply the configuration of DNSSEC to our clients within the environment. To do this we open the Group Policy Management Tool.


In the Group Policy Management Tool create  Group Policy Object under the domain called DNSSEC or what can be identified by you as seen below.


Next we will configure the GPO by selecting Computer Configuration, Policies, Windows Settings and then Name Resolution Policy as pictured below.


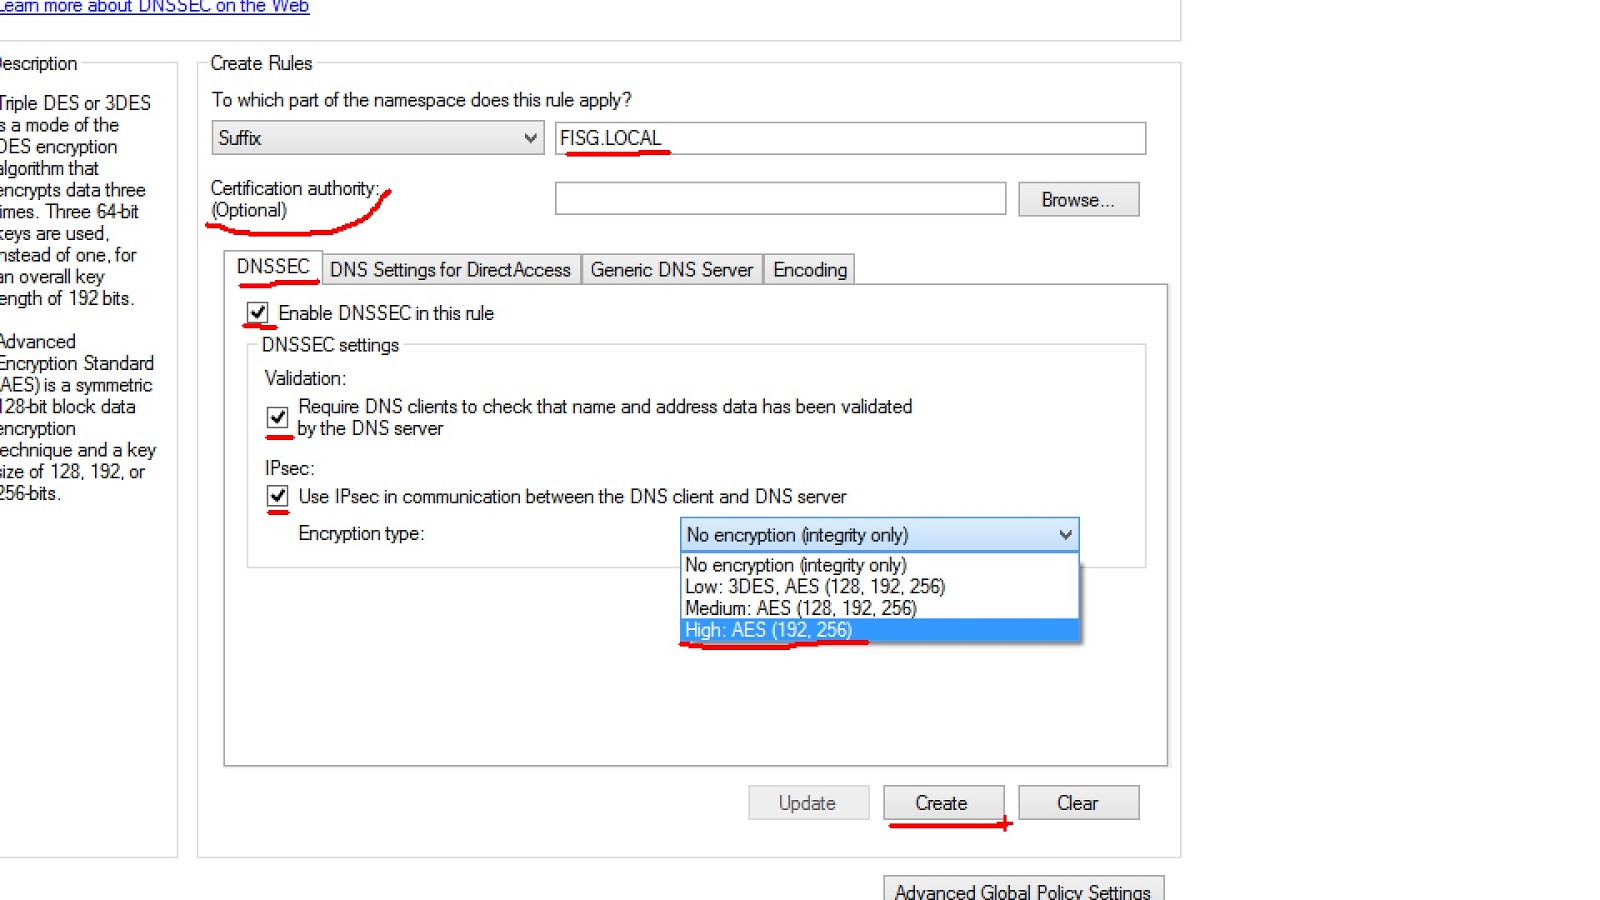
In the Name Resolution Policy GPO edit settings. A rule can be created under the suffix, prefix and so on. We will configure DNSSEC under the suffix fisg.local for the lab.


Next we will enable DNSSEC with the validation settings in place. There is an IPsec selection to the bottom which you can include in the configuration. Note: For IPsec to be enabled successfully in DNSSEC an already existing IPSEC configuration should reside on the network. Enabling IPsec with the level of encryption will not deploy IPsec to your environment. It instead uses the existing one that is present. If there is none. Your client computers will no longer be able to communicate with your DNS Servers until the policy is removed. 


Next apply the GPO on both the DNS Server and Clients by using the gpupdate /force command in PowerShell. You can check your settings by opening PowerShell and running the
get-dnsclientnrptpolicy command. You will get a screen as seen below. Your DNS Server will also look like below to show that validation and DNSSEC is now implemented.


DNSSEC is now successfully installed!
 
 
By Adnan Cartwright

Tuesday, August 7, 2012

Installing Active Directory on Windows Server 2012 Core

Microsoft has indeed made installing roles and features a great ease. To install Active Directory on Serve Core 2012 we must first configure the server to promote it to a domain by using the sconfig command.


The next step is to prepare our unattended file for Active Directory.


Our next step is run the unattended file to install Active Directory and DNS.


The Active Directory installation will run and install DNS.


As the installation runs normal Active Directory install and securing will take place.


Once completed depending on your unattended file the system will reboot if yes was selected in your answer file.


Once restarted the next step is to enable remote management to manage the Server Core from your Windows 8 Client. Using the sconfig command enter the remote management option by pressing 4 and then 1 to enable remote management.


To manage Active Directory from your Windows 8 client the next step is first join the Windows 8 client to the domain then install the Remote Server and Administration Tool (RSAT) for Windows 8. RSAT for Windows can be downloaded here.


Once RSAT is installed. Depending on your network needs you can turn on and off features to manage from your Windows 8 Client. By default all RSAT features are turned on for server roles and features.


From the Start UI you can now access Server Manager and Administrative Tools to manage your network.


In Server Manager select manage then add the server you would like to manage.


Once the server is added that you would like to manage. Select tools to choose the role or feature you would like to manage.


Now you can manage and configure Active Directory on Server Core 2012 from your Windows 8 Client.

PowerShell Configuration Added

Another way we can install Active Directory on Windows Server 2012 Core is using PowerShell. As you can see this server is still a non-domain server and apart of a workgroup.


Exit back to the command prompt by selecting 15 from the menu. From the command prompt type PowerShell to switch to PowerShell mode.


While in PowerShell Mode type Install-WindowsFeature AD-Domain-Services -IncludeManagementTools The binaries for Active Directory and perquisites will be installed as seen below.


With the installation now finished. We can add our AD Forest to the server to complete our AD install on Server 2012 Core. The yellow message below warns me that I did not check for any Windows Updates. Not needed for this demo but is best practice in production.


Next we will need to type the PowerShell command Install-ADDSForest -DomainName (enter your domain name here and remove brackets). In this case we will use CORP.FISG.LOCAL. So the PowerShell command I will use to add a forest will be Install-ADDSForest -DomainName CORP.FISG.LOCAL


Once the command is ran you will be prompted to add a SafeAdminPassword which is used for Active Directory Recovery. Put the password in and confirm it.


Once done you will get the final message that states that the target server will be configured as a Domain Controller. Select Yes to all and the promotion will take place as seen below.


You have now successfully configured your Server Core 2012 machine as a Domain Controller as seen below.


Happy Server Administrating. If you need to download Server resources or if you would like to try this lab in Azure visit:

For Server Downloads - http://aka.ms/msproducts

For a free trial of Windows Azure - http://aka.ms/try-azure

By: Adnan Cartwright

Wednesday, January 25, 2012

Using Network Access Protection

Network Access Protection (NAP) has become the standard when protecting your environment. It is not just a policy to restrict infected computers from the network. But a policy to encourage computers to comply with security and health requirement policies and reduce the risk of malware spreading.  Non-compliant clients can be restricted from accessing intranet resources or communicating with compliant computers. Using Network Access Protection (NAP), IT administrators can require client computers to be healthy and comply with corporate health requirement policies. For example, client computers can obtain a full connection to the intranet only if they have recent security updates, anti-malware definitions, and other security settings.


Using NAP requires that NAP-enabled clients submit a health certificate for authentication when creating the initial connection with the Network Policy server. The health certificate contains the computer’s identity and proof of system health compliance. A NAP-enabled client obtains a health certificate by submitting its health state information, either to a Health Registration Authority (HRA) that is located on the Internet, or to an internal HRA server accessible using the infrastructure tunnel.


By using NAP, a non-compliant client computer that becomes infected with malware can still connect to all the specified management servers (for example, DNS, DC, HRA, and remediation servers) through the infrastructure tunnel, but it cannot connect to all other intranet resources. Access to the remediation servers is crucial to remediate the non-compliant state of the client.

The video installation tutorial and lab is available for viewing at http://youtu.be/yxNfo6KCSQY

By: Adnan Cartwright